I just recently bought a pack of vellum for something I needed just one sheet for, but it was cheaper in the long run just to buy a pack...so, I have all this vellum and I had no idea what I could do with it. Vellum is one of those things that I just haven't worked with a lot, so I Googled it and the search engine came up with many ideas and videos. So, I spent A few minutes looking at all the possibilities...
In the first picture there are two ideas. The first one is just to stamp on it like you normally would a regular piece of paper...it takes a little longer to dry, so be prepared to have to wait on it for a few minutes. I just took a set of circle stamps that I bought at Hobby Lobby and used the Stampin Up! Earth Elements stamp set and started stamping! I made my own little design that I am sure I will use on a card in the future. The second idea is to emboss it by running it through your embossing machine. In my case, I have a Cuttlebug and I just ran it through using the one pictured above. I then colored in the bird on the BACK of the vellum with a blue marker. The not so fun thing about vellum is adhering it onto a piece of card stock without it being obvious. Creative Memories has some frosted squares that are supposed to not show...I haven't had much luck with them. They are better than regular adhesive but you can still see them. The best thing I have found is to use spray adhesive...a very thin layer at a longer distance than what the back of the can may say. You usually can not see it unless you use too much.
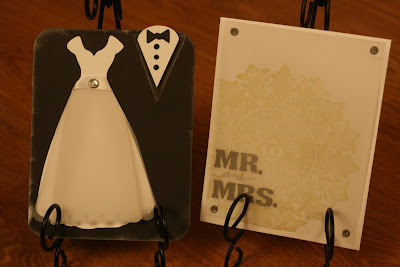
This second picture includes two wedding-ish cards. The first one, I saw online on Google Images. On the image there, the creator used a sheer ribbon or tulle. I thought that I could pull off vellum, so I tried and it came out great! (I have all the measurements and folds below.). The second card is really classy! I used the Medallion stamp from Stampin UP! and stamped it with Old Olive from the Earth Elements collection. I secured it to the card base by using eyelets on each corner. That is all that is holding it down. I then used silver stickers and spelled out Mr. and Mrs. And then wrote in "and" with a silver gel pen. It came out so cute and classy! Now, I just need someone to get married and I am all set! :-)
Instructions for the bride and groom card:
1. Cute a piece of vellum that is 4 1/4 x 4 1/4. Place it on your cutting map and make a dot (with a PENCIL) at the very top at 1 1/2 inches and at 3 1/2 inches. On the bottom make a dot at 3/4 inch and 3 1/2 inches. Connect the top dots to the bottom dots as shown below...
2. Now you are going to fold on those lines with the flap at the back of the vellum. Then you will turn the vellum over with the flaps on the top. At the top of the vellum you will now take each corner of the flaps and line up the point of the corner with the corner of the fold you just made. See the picture below...
3. You can now border punch the bottom of the "dress" with whatever border punch you would like to use. Now, the dress and the tux pieces I cut out on my SCAL software. My vellum actually fit almost exactly on the dress I used....I was incredibly lucky! I trimmed a little bit off each side and folded the top around the waist of the dress to slim up the waist a little bit, but that was all. Depending on what dress you cut out, you will have to arrange the vellum accordingly. You could free hand a dress or look up "wedding dress silhouette" on Google Images and print one out for a guide. The tux is just two triangles (the white one having a rounded top). I placed the bowtie and used black glitter glue from Micheal's for the three buttons.
Don't let vellum scare you anymore...seriously, search "vellum" on YouTube, and you will be amazed at how many videos there are about the different uses! Have fun and remember, it is always homemade!
21 hours ago


0 comments:
Post a Comment