Showing posts with label Card. Show all posts

Monday, November 19, 2012

Hello, Dear Friend: Sketch #3


This week's skecth comes from www.cardpositioningsystems.blogspot.com .  I wanted to use one of my new stamp sets and this bike from the SU! Moving Forward set fit perfectly on the front of this card.  Don't freak out but I did cut the sentiment away from this bike image and used it separately on the bottom of the card.  I did that with each stamp in that set that contained an image and a sentiment together.  It just works better for me that way.  I really like the vintage feel of this card and will probably make another one soon.  Hope you have a great day and remember, it is always homemade!

Monday, November 12, 2012

Sketch #2 With Video


(Sketch from www.cleanandsimplestamping.com  #209)
 
 
So, this week, I was looking for something that I could use washi tape (the newest fad) with and this sketch was PERFECT!!  So, I went to work and made a few variations. 
 
 
My Original


The same sketch but with different sentiments...


With Paper for Holiday Cards


And while I had the washi tape out....


Below is the video that accompanies this sketch....ENJOY and remember, it is always homemade!

Monday, November 5, 2012

Sketch #1


(This sketch is from www.gotsketch.blogspot.com April 2012)
 
There are several places online that you can go and find sketches for cards and scrapbook layouts.  Millions, actually!  So, this month and next we are going to do a new sketch each week.  This month, the sketches will be on Mondays.  A list of places to look for sketches are at the end of this post.
 
We start with this sketch which I actually saw on Pinterest and tracked it down to the original website for you guys.  With the Chevron pattern being so "in" right now, I thought this would be a fun one to start out with.  As you look at my card below, it is obvious that I did not copy it exactly but you can see the general layout in my card.  That is the point of sketches....to get your brain working and make something original. 
 
Hope you enjoy the sketches to come and remember it is always homemade.


Here are a few places to go to for inspiration through sketches.


Wednesday, October 17, 2012

Inspiration Everywhere


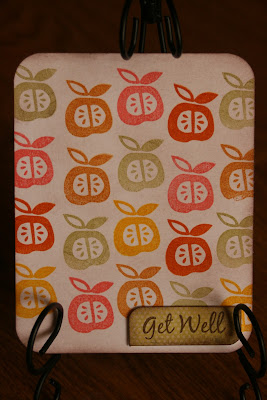
So, my mother sends the kids little treats and notes in the mail every other week or so and this past week was one of those times.  The card pictured below is what was in their little envelope along with Frosty coupons....which were a huge hit!  Anyway, I saw th card and immediately thought of trying to recreate it somehow.  I knew I had a few apple stamps that would work and so, I started stamping!  The above card was the result.  The apples, for some reason, today reminded me of the saying, "An apple a day, keeps the doctor away", and so I made this into a "get well" card for someone in the future.  I used some colors that were very "fallish" since I am in that "zone" and I think it turned out really cute.  So, the moral of the story is this:  If you see something you like, try to recreate it....even though it might come out totally different but if it got your brain working, then that was worth the time.  Have a great day and remember it is always homemade.


Wednesday, October 10, 2012

Family Birthday Cards


So, here is my confession for the year to all of our family.  Instead of making each individual card differently for each member of our family, this year all the girls are getting one card and the all the guys are getting another.  The girl's card you saw last week on World Card Making Day but the guy's card is new.  I used the chevron embossing folder for the background and then just used half of a circle punch for the banners.  I raided my scrap box and made 12 cards with all scraps.  So, this card is also a great way to use your scraps.  I then sewed the banner pieces onto the card.  This is the first time I have ever sewn on a card!  Usually my sewing machine is not just sitting out but the day I started making cards, it was!  So, since I have been wanting to make this card for a while (but my machine is never out) I thought this would be a prime time to make them.  So, off to work I went.  Here are the results of my sewing adventures......


Saturday, October 6, 2012

World Card Making Day Has Arrived!!!!!


World Card Making Day 2012

I, like many of you, love to make cards!  It is so much fun using your creative juices creating all of our cards, but also, it is even more fun sending them out to others!  You know, I have heard a fellow card maker say, that when YOU make cards, it is rare that you get one in your own mailbox.  But, we LOVE when we do!  Anyway....it is card making day!  Do you know how many people in the world today will be making cards to share with others?  Probably thousands and maybe even more!  So, why not sit down at your crafting space and make a few cards today!  Just tell your family that you HAVE to because, it IS world cardmaking day, you know! 

Well, I on the other hand have been working this week to bring you a few quick, easy, clean and simple cards that I have made to send in to the Paper Craft Magazine contest.  (I would appreciate it if you would not copy these cards and send them in under your name.  If you do, you will have to live with that decision.  If you duplicate these cards please use them for your personal use.) 

Now, here are a few of the cards I made this week.  Hope you enjoy and have a great day making lots of cards to share with others! 


Have a wonderful, stampin' day!  Remember, here at H.S. Homemade, it is always, always, always homemade!


Wednesday, October 3, 2012

You Capture My Heart....


This little sentiment I used from a card I saw in the Paper Craft magazine.  It had a jar with hearts in it as well but the general layout of my card is totally different.  I cut this jar out of a piece of 12x12 paper that was covered with mason jars with several varieties of objects inside of them.  When I saw this one with the hearts I knew it would be perfect for this card.  Have a great day and remember it is always homemade.

Monday, September 24, 2012

Last Mini Card "Sketch"


Well, here we are at the last week of the mini card sketch series.  I hope you all have enjoyed it as much as I have.  It has been lots of fun.  So fun in fact that I have decided to have a series each month for the rest of the year.  The list is below!  Go check it out and I hope you get excited because it is going to be lots of fun! 
 
On to the card....So, the mini card was soooo cute (love, love, love the banner at the bottom) but due to the empty space that needed to be filled in the middle, I chose not to do the banner.  Instead, I used some embroidery thread and wrapped some around the bottom of the card.  LOVE the flower that I punched out with my new punch from SU!.  I stamped a medallion stamp (not sure what set it came from) and then punched out some of the image with the punch.  It turned out very cute, I think!  Then, instead of the "today" at the top I stamped "friend" and brackets.  I think even though it wasn't an exact replica it still turned out really cute and fun!  Hope you enjoyed this series.  Don't forget to scroll down to see the series coming up!  Remember, it is always homemade!
 
October:  Mondays = Series of Halloween Themed Projects
 
November:  Mondays = Cards from Sketches (from different websites)
Wednesdays = Fall Themed Projects
 
December:  Mondays = Christmas Themed Projects
Wednesdays = More Cards from Sketches


Wednesday, September 19, 2012

Quick Flat Note Cards


This is a quick set of flat note cards that I made one day after purchasing a set of 10 or 12 border stamps at Hobby Lobby while they were on sale.  I see many uses for them in the near future!  Last week, you saw the ABC border on the tag that accompanied the pencil crafts that I made for my son's pre-school teachers.  These borders are great for quick cards, quick embellishments on scrapbook pages and also for small tags.  I am sure there will be many more uses for them in the future!  Hope you enjoy and remember, it is always homemade!

Monday, September 17, 2012

Circles...


So, this week, here is the card that I made using this mini card as the sketch.  I hope you all have been enjoying this series because I sure have.  It is really fun trying to re-create these little cards.  This one is basically the same just using different colors.  The folder look on my card is made using a rectangular shape and adding a label punch to add the flap.  I used my embossing machine to make the zig zag sewing effect.  The faux stitching on the middle circle is a rub-on.  I inked it up and called it done.  Just another way to take a sketch and make it into an actual card.  Have a great day and remember it is always homemade.
 

Monday, September 10, 2012

Inspiration Card #2 of 4


The "sketch"
 
Where as last week's card was a little different from the sketch, this one is nearly identical.  This is probably one of my most favorite cards that I have ever made.  The colors are just perfect together and it just flows so well.  I used a demask stamp (lightly stamped) on the red hear to give it the effect of the sketch.  It just really turned out cute!  Have a great day and remember it is always homemade! 

Wednesday, September 5, 2012

Card Set and Box


This is basically only a 3x3 card set with embossed envelopes....but, how cute are they in this little box?  The cards are stamped with a demask stamp, "celebrate everything" stamp and then I used my score board to make the three embossed lines above and below the sentiment.  I also added a little gem in the middle of the demask stamped image.  Cute, easy, and classy!  I then made some vellum stickers to place on the back of each envelope.  The instructions for the box are HERE.  The only difference is that I used vellum instead of Stampin' UP! window paper (I think that is what it is called).  Anyway....hope you enjoy making this little card set and box for someone!  Remember, it is always homemade!

Monday, September 3, 2012

Inspiration Card #1 of 4


To start off this little series on my blog, you get two card ideas and two videos!  No, I am not kidding!  Kristina Werner did a short series on how she finds inspiration all around her from her surroundings and all different types of scrapbooking items.  One of her quick tips during this series was looking at small printed tags and using those as a "sketch" of sorts.  So, this month, we are going to focus on that aspect.  I bought several 12x12 pieces of paper that had 12-16 tags printed on them (you can see these in the first video below).  I have taken that tag this week and made two cards.  The first is actually using the tag on a card and the second one is using the tag itself as the sketch.  Below are the videos of my making both cards and showing you how this works.  I hope you enjoy this series and I hope it gets your juices flowing.  I have had a lot of fun making these series of cards.  Hope you enjoy and remember it is always homemade!
 
Video 1
 
 
Video 2


Wednesday, August 29, 2012

Card/Tag


This is a cute Card/Tag to send to a married couple or to your hubby one day in his lunch or in his luggage when he is going out of town.  It is a simple tag that is decorated with a place on the back for a quick message.  The playing cards are from the Dollar Tree.  They are mini cards.  Very cute and perfect for the use on small card fronts or scrapbook pages.  You never know what you will find at the Dollar Tree or a Thrift Store.  Check it one out one day soon going in with just a "creative" mind.  You will find more than you think!  Have a great day of crafting and remember, it is always homemade!

Monday, August 27, 2012

Quick and Easy Make-n-Take


First of all, I know this picture is not the best, but I wanted to show you all of the circles that I stamped.  While in Florida, I had to take some kind of crafting project to work on....I had gotten several stamp sets out that I had not really used much yet and I wanted to play with them a little bit.  So, I punched out many circles and then I stamped them all with all different kinds of stamps.  When I got home, I used my scalloped circle punch and punched out printed paper to match each stamp.  The following pictures are some quick projects and cards that you can make with these on the go....
Have a great day and remember it is always homemade.


Monday, August 20, 2012

Peek-a-boo Card....Soooooo Cute!


This is a really cute card.  I will say that it isn't the easiest card to make but after you make it once it is easier the second time.  FYI before you start--DO NOT TRY TO CHANGE THE SIZE OF THE CIRCLE PUNCH...just sayin'!  It will not work....the smaller circle works perfectly.  The front of my card looks a little different than the one in the video below but that's what's great about any card....you decorate it to your own taste and to your own genre of card.  I made mine into a "True Love" card.  I always need cards to send with my husband when he goes out of town so, just a warning, I have made several lately!  You will probably see them soon!  :-) 

Anyway, below is the video from which I got the directions to make this card.  Dawn is a Stampin' UP! demonstrator and she has a great blog and many videos on YouTube.  Her YouTube channel is "dawn5377" and her blog is www.dawnsstampingthoughts.net  

Enjoy the video and making one of these really cute cards!  Remember, everything is always homemade!

Monday, August 13, 2012

Button Card Set


  So this is the cheapest thing you can make!  I bought the felt buttons at Big Lots for ONE DOLLAR.  I used 1 1/4 piece of white cardstock and then stamped the words on each and it made such a cute little set of 3x3 cards.  Simple, cute, easy and cheap.  That is what I like best!

Always simple, always homemade!

Monday, July 30, 2012

3x3 Card Set


I have been wanting to make some little card sets for a while to use basically when you need a quick card to put with a gift.  I saw some in the new Stampin' UP! Catalog and that was the "push" I needed to get on with it and make some!  You could do these with whatever type of stamp you wanted.  I chose to do them in two different ways today to show you two different ways to "color" the stamps.

The first set (fruit set) are colored different colors with the stamp pad used or with markers and then stamped onto the white.  This takes a little time and patience but the outcome is obviously very cute! 


The second set (the "nature" set) is a variety of stamps that were originally stamped in brown ink and then colored in with watercolor pencils and a blender pen.  This is a fun technique that I am still not great at, but it turns out very cute when done right!  :)  I especially like the tree stamp!  I may do a whole set with that stamp alone! 

The envelopes were cut out using the Cricut Beyond Birthdays Cartridge at 4 1/4.  It comes out to be a perfect size for the 3x3 cards.  I did do something a little new for me and that is I lined the envelopes and made them that much more cute!  It only takes a couple extra minutes to do that and it adds much more character.  Also, as a side note, these little 3x3 cards it perfectly into the little magazine holder that I showed you in a tutorial back a couple of months ago.  You can see that tutorial HERE on my blog as well as Beth's blog (where I saw the idea) HERE.

You could make these with any stamp.  The good thing about them is that they are quick and easy and you can make them to your liking.  I thought you could stamp babys on them, girl or boy themed stamps, demask stamps...etc....the list could go on and on.  Make them to fit your needs.  If you give a lot of gifts to kids, make them fit that need.  Keep a stash so that when you need that quick card, you can always go grab one in a flash!

Be creative and remember, it is always homemade!


Monday, July 23, 2012

Being "Square" IS Cool!


So this is the easiest, quickest card you could ever make and see how classy it looks!  I know I say all of these cards are easy and quick but this one really is a no-brainer!  I saw a similar card in the March/April 2012 Paper Crafts Magazine (Pg. 39).  I changed it just a bit but used the overlapping square idea.   All you do is make three score lines at the bottom of the card that are 1/8 inch apart.  Then, use a square punch and punch out 9 squares in all different prints of paper.  I chose all polka dotted paper so that there was a general theme, but it can just be a hodge podge of prints.  Next, adhere the squares one on top of the other.  Finish by stamping a sentiment just above the squares.

It may only take 5 minutes, but it is always homemade.

Monday, July 16, 2012

Another Triangle Folded Card


This card is just another take on a triangle folded card.  The front flap (as seen in the second picture) is folded to the front and the blue square is glued flat onto the folded triangle.  This turns out to be a 5x5 card in the end.  It is really cute and a little out of the ordinary which gives it character!  :)  The decoration on the front is pretty self explanatory.  Hope you have fun making one of these!  Remember it is always homemade!

Followers


Copyright © 2008 Designed by SimplyWP | Made free by Scrapbooking Software | Bloggerized by Ipiet Notez | Blog Templates created by Web Hosting Men