Yes, I have been on Pinterest.com yet again! I saw a layout with this general layout...you know it always changes when you get YOUR pictures on it. I think it turned out really cute and it didn't take long at all! I think it was good that I already had the layout in my mind but also it is a very easy but cute layout to put together! Hope you guys enjoy the summer pictures in this layout. Also, an apology to my son and the picture in the bottom right corner! One day, he will NOT appreciate this picture!
Have a great day of crafting and remember, it will always be homemade!
Again, I got this idea out of the Paper Crafts 365 Cards Magazine. Mine is a little different but the same general layout. I basically took the circle cut-out idea and ran with it. This is a 4 1/2x4 1/2 size card and the inside square is about 4x4 with the circle cut out of the center. I took a Martha Stewart stamp set that had this plaid ring in it and used that to measure the circle diecut. You basically just diecut the circle out and then stamp around the edges. Then you can add the heart if you would like...I just thought it needed something else and the heart worked very nicely! I then took my new stamp set, as seen below, and stamped a baby figure out and colored it in with my watercolor pencils and blending pen. I use these a good bit of the time and love them! It is totally worth the money, especially for coloring in images that you stamp. I think the pencils range around the $15 mark (which you can use your 40% off coupon on) and the blending pen is around $2.99, which you can also use your coupon on...so, it winds up a very cheap buy for watercolors.
In the pictures below, you can see the stamp set that I used. I was so psyched when I saw this set at Hobby Lobby! It is the same idea as the Stampin UP! set called "All In The Family", but MUCH cheaper. You don't have quite as many options and they are smaller stamps, but for what I plan on using it for, it is perfect!! Normal price for this set is $9.99, which is a steal already but using your coupon for 40% off makes the deal even sweeter...which is of course what I did! I have used it only this once so far but I know I will use it more! I was so excited when I saw it!
A little closer...
Have a great day and remember, it is always homemade!
I mean, seriously, you can't get more basic than this card....but it is sooooo cute! I am an x-ray tech by trade (SAHM by choice), and I used to work at an outpatient surgical center. I was there for 3 years and I LOVED working there! There was a pain doc (who worked with people with severe back pain) there who we worked with two days out of the week and he was bald but had glasses and a curled up mustache. He was such a good sport and we made fun of his bald head all the time. When I saw this card in the Paper Crafts 365 Card Magazine, I couldn't help but think of him! It looks just like him! ;) Anyway...I just punched a couple of circles out, attached the wiggle eyes (which I got out of my kids' craft stash), diecut the mustache out in my SCAL software and adhered it all to the card. Then only the stamp was left. Such an easy and quick card. I actually made two at the same time. This card is just a fun card that could be sent to anyone, anytime. I hope you enjoy the card. Have a great day and remember, it is always homemade.
I had fun reminiscing while doing this layout. My husband and I canned all by ourselves for the first time two summers ago. Both of our mothers canned many different things throughout the years and we grew up watching them tackle this adventure flawlessly. My mom canned so many green beans every summer that we never had to buy them in the store...and we ate A LOT of green beans each year...so that tells you how much she canned. She canned chicken, beef, black-eyed peas, crowder peas...and what she couldn't can, she froze! She has the most packed freezer I have ever seen and the fullest (is this a word?) pie safe of canned goods you could ever imagine....but anyway...I degress...you get the point.
So, last night I went to working on this layout...it was a little different in my mind, but still turned out cute. Here we are canning green beans and blueberry jelly. I got the title from a book that my mother gave me for Christmas this past year. It is an "all about canning" book entitled...You Can Can!. How cute, huh??? Anyway....hope you enjoy the layout.
Next Week: A few cute cards to show up next week for sure, along with a possible sewing project or two! My birthday was this past Wednesday and I bought a new sewing machine today with my birthday money! I am about to get it out of the box and play a little bit! Woot Woot! So excited! I bought a few yards of fabric on Friday for some dress patterns for my little girl! So can't wait to use it!
Have a great day and remember, it is always homemade!
Okay, so here it is along with a video of how-to. I made a lot of mistakes while making this...primarily in the order I tried to conquer this project...but, I will tell you how you SHOULD do it and then you won't have as much trouble as I did! It took me a few weeks to do this...a little at a time...but it shouldn't take you too long if you do it in the right order! My husband was out of town this past weekend and I worked on this thing diligently when my kids were taking naps as well as late at night each night! I lost sleep over this thing! Doesn't that make it worth something?? ;). I will probably make some changes along the way but I am generally happy with it right now! I hope you enjoy the video and the steps you should take before beginning this project!
Something else I thought about after I made this video is that I think before every trip that we take this journal on, I could cut out some shapes or words that would "go with" the trip and slide them into a pocket so that I would have some diecuts to use if I wanted to.....for example, last year we went to NYC and I could have cut out small images of the statue of liberty, a taxi cab...etc. It would be really cute to have some diecuts with you on the trip to stash into your pages! Just a thought!
Steps On How-to Make This Smash Book More Efficiently:
1. Pick you primary paper that you are going to use and cut into the same size pieces (however large you want them). Mine are all 6x6 squares. The cover pieces are 6 1/4x6 1/4.
2. Make a pile of tags, envelopes, book pages, puzzles, scraps, tickets, etc....that you want to insert into the book pages. AFTER you have pulled all these out, flip through the base pages and insert all your tags and other pieces.
3. Make the amount of dividers that you want in your book....you can make them regular dividers or you can make them with pockets.
4. Ink all the edges that you desire!
5. Put in all your stamps and any embelishments that you want to! Stamps, paper clips, flowers...etc.
6. Punch holes into your covers! DON'T do it after you designed the cover...take it from me, DON'T do this!!!
7. Design your covers!
8. Insert rings!
9. You are done!!
Have a great day and remember it is always homemade!!
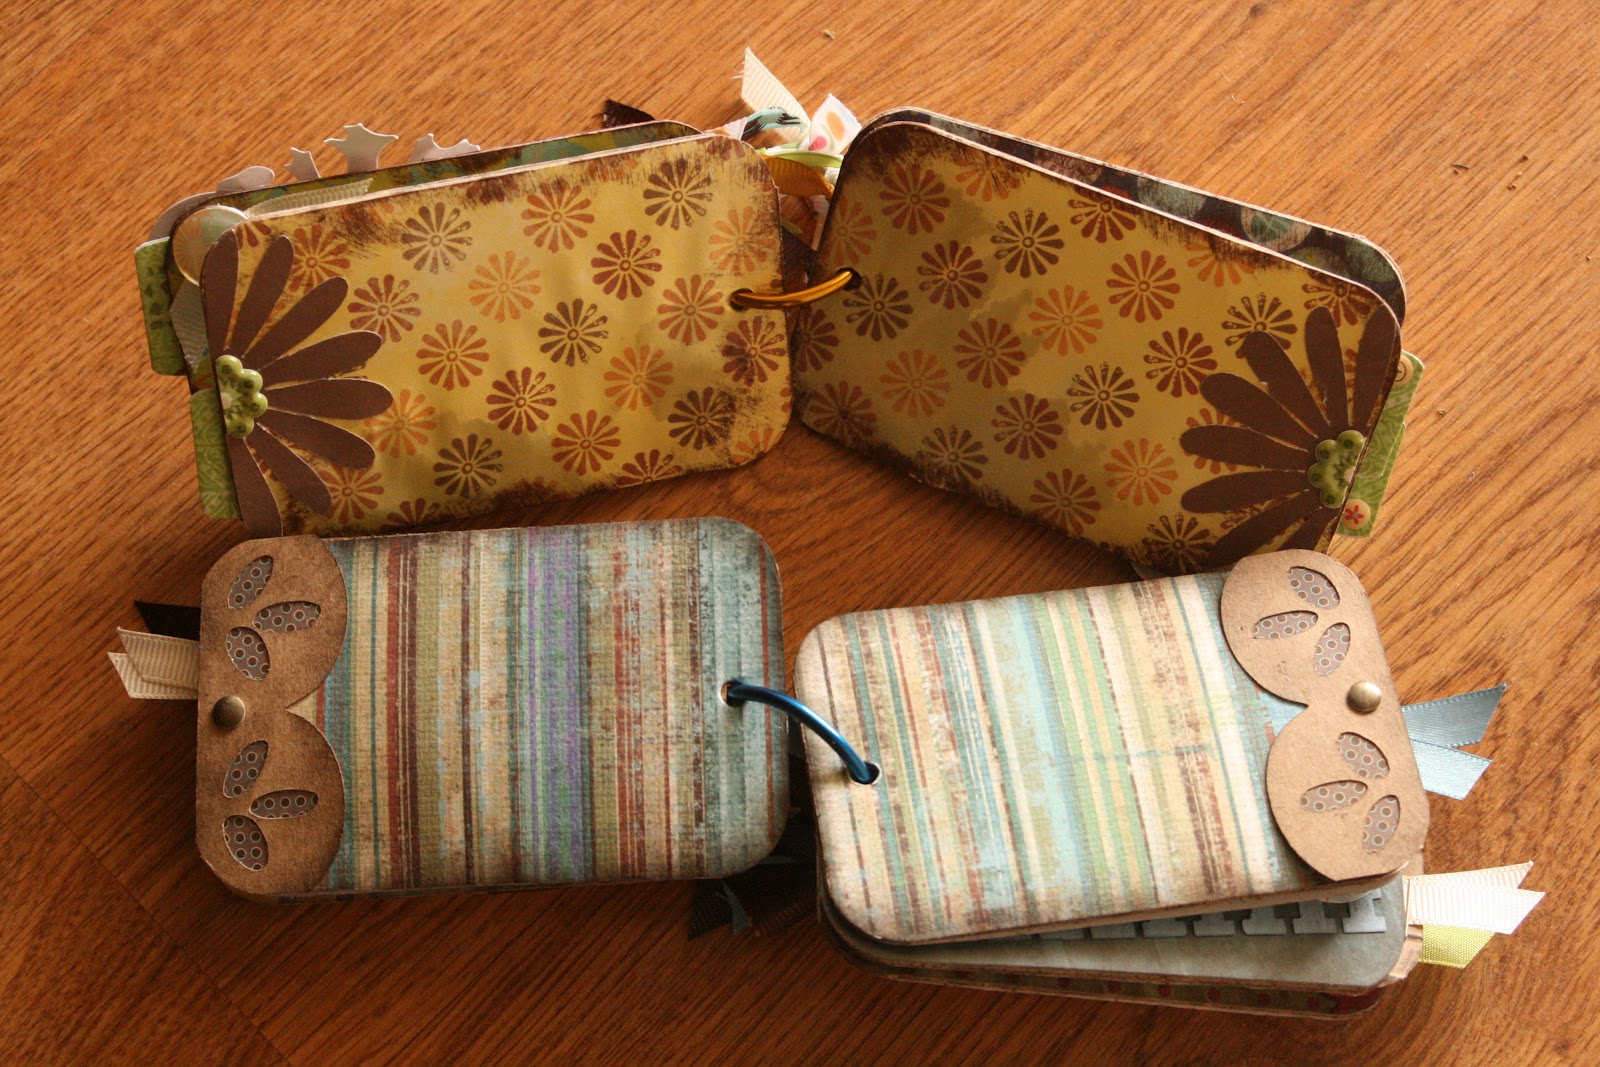
Disclaimer about pictures: My daughter spilt water, right before I took these pictures, onto the fall themed album....sorry for the water spots!!!!
I know this sounds crazy! I assure you, I thought it did too until I actually made one myself! It is so cute and great for small pics that you may have of a one day event, holiday or just some random pictures you need to put somewhere! I have made two....I made one last year around Thanksgiving and one this past week that is very generic in color and theme.
I did not do a video for this, but if you go to www.youtube.com search "toilet paper roll album with dawn", she has a great video tutorial, which is the where I actually saw this for the first time.
I hope you like these two albums above! The Thanksgiving one above, I may use this year and use it to write all of our "blessings" down in when the kids think of something that they are thankful for...they come up with the greatest things and sometimes you don't want to forget them. So, I thought this little album would be great for that purpose this coming Thanksgiving. The second one, I may give to someone....who knows. Maybe I will fill it with pictures!
Here you have a great day of crafting! I am working on my smash journal daily and I almost have it done. My husband was out of town this weekend so I worked on it while he was gone. I stay up really late when he is gone and get stuff done! I can't sleep when he is gone, so I might as well do something crafty, right? ;). I hope to have it completed with a video to share with you on Wednesday...which, by the way, is my BIRTHDAY! ;). Once you reach 30, which was last year, birthdays don't seem as much fun! ;). Thirty wasn't so bad but this year I am 30-something....anyway....
Have an great day and remember, it is always homemade!
I have been waiting to do this layout for a long time! Believe it or not, I have had this blueberry and blue dotted paper FOREVER....waiting for these pictures! I bought this paper not too long after we went blueberry picking with a church group and have held it patiently until now! I also used some craft paper, green paper and light purple paper. I put it all together and it turned out quite nicely! :-) He was so cute while picking blueberries! He finally sat down under a bush and just started eating them! I think he ate more that day than he picked! We had a blast and by the end of the morning, we were all sick of blueberries!! :-) I made the blueberries on this page with a navy paper from Creative Memories and then stamped a star on the top to make it look like the actual berry. I also inked the edges to give them some deminsion. I saw this idea in a magazine along the way and always knew that I would add these cute little berries to my page one day! Today was the day! Hope you enjoy the layout!
Here is a close-up image of the blueberries! Aren't they adorable???? So cute and just right!
Have a great day and remember it is always homemade!
I went to Tuesday Morning here in town a couple of weeks ago (Tuesday Morning is a store that sells name brand things at a discount) and found this "circle design" paper in a pack for $1.99. You get 25 sheets of double sided cardstock made by American Crafts for only $1.99!!!! Seriously! It is a huge pack of the same paper but, when you do a lot of crafts it comes in handy when you make double of everything. When I made this set I used this paper as an accent on each card. I also made the two boxes (as seen below) with this cardstock as well so that when I sell it or give it away, it all matches! I made two sets of these cards when I made them because it is always easier to go ahead and make another set at the same time. This paper is so cute and you can do so many things with it and use so many different color combinations.
These are the boxes that I made to put the 2 sets of cards in to give away or sell. The one on the left is the "magazine type" box that I did a video on a couple of weeks ago. The one on the right is a new box that takes minutes to make! You can see directions in the video below...
This is the back of the box on the right in the picture above.
My new stamp set from Christmas has been sitting in my craft area for 3 months and I haven't even touched it....can you believe it??? I can't either!!! Of all the cards I have done since Christmas I haven't once used this new stamp set. It is called Up, Up and Away by Stampin UP!. It is a really cute set that includes several hot air balloons (on this card and envelope you see 4 out of 5), clouds (as seen above), birds and several little sayings. You could do a lot with this stamp set and I am sure that you will see more of it in the future.
To begin with, I tore a green patterned paper into strips and glued them down to appear as a grassy hill. I stamped my balloons onto white paper and then proceeded to cut them out...very slowly...that is not my best skill! I then placed them where I wanted them to go and stamped the balloon rope of each onto the card base. I then used pop dots and placed the balloons on the card. I stamped the sentiment onto a scallopped square and placed it as well. The clouds where in this set as well and I stamped them with white ink onto the card front.
Hope you enjoy the card! Have a great day and remember it is always homemade!
First of all, let me apologize for this picture! The chipboard you see behind the page on the left IS NOT part of the page. I couldn't find my other piece that is 12x12 and so this is what I had to use. I guess I could have cut it down but I was trying to get these pictures done before it got dark outside. Natural light is the best and it seems I usually take my scrapbook layout pictures at the end of the day or before a storm comes in...you know, when it gets all dark and yucky looking outside....Anyway...
A couple of weeks ago I got these pictures out to do this layout and I just didn't feel like scraping a "haircut" page that day...ever feel like that??? Well, I set the pictures "aside" and I have been looking for them ever since! I didn't put them in my usual "to be scrapped" file and I could not find them! So, today, I ransacked my scrap area and found them! So, I went to work on this layout.
I really liked this polka dot paper and I thought it would be so cute with these pictures. I picked the solid colors out and started cropping and glueing. I also really like the border sticker on each side of the paper. I got this pack a while ago and love each and ever border that is included. I have used them several times and still have a lot left to use! I got it really cheap which makes it even better!!! I cut the letters out on my Cricut using my SCAL program and the envelope was on my cartridge "Going Places". It is a great little envelope that I have used several times. (Side note: I am going to cut out several of these for my Smash Book that I am working on!) I used the envelope for the haircut certificate, receipt and also this will be my journaling box. I had also saved a snippet of his hair and put it into a clear adhesive envelope that I matted and adhered to the layout. I got the title off of the internet. I will be the first to admit that I am not creative when it comes to the title. Many of my cute titles have come from my husband or someone else. If you aren't good at this either go to www.scrapbook.com/title or http://www.theperfecttitle.com/ Both of these websites are great to get your juices flowing.
I hope you enjoy the layout and that it inspires you to do that layout you just don't feel like doing today! Have a great day and remember it is always homemade.
PS: I just realized that I forgot to stamp above the snippet of hair "first snip". I will do that now! Oops! And, I need to add a date...man, where was my mind????
This is a homemade (of course) Card Sketches Booklet that I made after watching a video on http://www.kwernerdesign.com/ . She posted this on February 13, 2012.
It was so cute that I just had to make one to use and to share with you. If you go to her website, you can watch the video on how to make it...it is simple! She also has a PDF file with the pre-made sheets for the inside pages. She has landscape and portrait squares on each page so that you can design the type of card that you want to at any time, any where!
I actually carry a small sketch book in my purse with me when I am out to the doctor's office or somewhere where I know there will be a wait. If I see any ideas or any come to me while out and about, I use this book to draw out my ideas. Even though I had one already, I thought I would use this too! Maybe I will have one for each purse/diaper bag!
Hope you enjoy this booklet and I hope you make one really soon....seriously, you can make this in less than 15 minutes. I used her same general layout with a few additions of my own. Get creative and get busy! Have fun and remember, it is always homemade!
So this video is just an extra little fun for the week...it features a few projects that are in the works and what is coming up next week! Hope you enjoy! If you have any comments, please suggest any ideas you may have!
My best friend had her baby on the first of March and of course I paid her a visit at the hospital! She loves owls so, along with a very cute owl toboggan (which wasn't ready yet) made by another friend of mine, I brought this as a welcoming gift and card to the hospital. I brought a picture of the toboggan for her to see. She was thrilled!
I saw a printed owl card online one day and I saved it because I thought that maybe I could make one with the same general principle in mind. The fold, I saw on www.kwernerdesign.com yet again. She has been going through a card of folding book lately and has had some really cool folds for homemade cards. This was one of them. The card base is a piece of paper that is 4 1/4x11. You then lay the paper horizontally on a score board and you score at 2 1/2 and at 7 1/2. So, after I had seen the printed owl card and then saw this fold, I knew what I would do....I would merge the two cards and make a really cute owl card! And---it was perfect timing for my friend's baby to come! :)
I covered the top and bottom flap with patterned paper. The top flap is 4 1/4x2 1/2 and the top flap is 4 1/4x3 1/2. The beak is just a large triangle that is inked around the edges. The eyes are made out of a 2 1/2 inch diameter circle, a 2 inch diameter circle and a 1 inch diameter circle. I inked the edges of the large eye circle, made dashes around the green circles and put little white lines in the blue circles of the eyes. I rounded the corners of the bottom flap and then cut a half oval out of the top flap to give the appearance of the ears of an owl. I used my Creative Memories cutting system to cut the oval out of the top flap. You have to leave enough on each side of the cut out area to keep the card flap attached. You then attach the bow and you can call it done and very, very cute!
Have a great day and remember it is always homemade!
....SCRAPBOOK!!! Well, we live in North Alabama and we were hit with pretty severe storms and tornados today. The first round started about 9:00am and that is when we lost power! It was calm during the middle part of the day and then started again around 3:00pm and is really not over yet! We have one more line of storms to come through and then maybe I will relax. I am originally from Florida and I HATE TORNADOS!!! Everyone always ask me why if I could live through hurricanes, why am I so scared of tornados....Here is the reason: YOU CAN OUTRUN A HURRICANE!!! Anyway, to say the least I was a basket case today until my husband came home about 1:00pm. I calm down a little when he is home during weather like this but I am still very high strung...just ask him one day! He is the one who will stand out in the driveway and watch a storm pass by! CRAZY!!
So, to get my mind off of the weather for a little while, while the weather was stable, I scrapbooked my layout for the week in a semi-dark room. Well, what are you going to do? I mean, crafting is my relaxing hobby and so, that is what I did. I did a cute layout in the dark today if I do say so myself. I had to do it in the dark (so if the colors don't match perfectly, oh well) and I had to do it without the use of my Cricut...so, this is what we got! I used the other origami dress for this layout since these were pictures of my daughter trying on her first dress! I matted the pink and white under the pictures and added the letter thickers. I then added the rest of the title on the pink strip at the bottom. I used a white gel pen to draw in faux stitches. I then added the date and the piece of paper on the left side of the page for journaling.
So, it may be in the dark, during bad weather, but it is always homemade!
You should be automatically redirected in 5 seconds. If not, visit
redirectLink" href='http://www.hshomemade.com/'> http://www.hshomemade.com
and update your bookmarks.
I am a Christian Wife and SAHM of two wonderful kids. In my spare time (which there is little of) I create! I make mostly paper crafts but I also sew some as well. I will try anything once! If you see anything that you would like to purchase on my blog, please feel free to email me at homemade.hs@gmail.com