Monday, January 30, 2012

Boys....And Their Trucks


My son was invited  to a Birthday Party last week and the little boy loves trucks...or so I heard!   Once kids get to a certain age, sometimes it is hard to buy the perfect gift, so, as a friend suggested last week, I went and got a gift card to Chick-fil-a instead of a toy.  Any of you that have kids know that they already have too much stuff/junk to play with and a gift card to a favorite eating place is a great gift!!!  So, this is what I am going to start getting when you just can't find that perfect gift.  Anyway, I had to make a card (because that is just what I do) and so I found a cute cement truck and cut it out on my Cricut using my SCAL software.  How cute is this!!  It turned out really cute!  Hope this inspires you to create something today!  Remember, it is always cute when it is homemade!

Sunday, January 29, 2012

Superhero Baby Shower Decorations


Well, it finally came and went last Friday night!  My friend's Superhero Baby Shower.  She is having her third boy in March and her husband as well as her boys LOVE Superheros, so, we went with this for the theme of the shower too!  I had a blast making stuff for the shower...she really liked all the decorations!  It was kind of "out of the box" but it went over really well.  Here are a few things that were made by me and others for the shower!  Enjoy!!

Superhero Door Hanging
This was on the front door when everyone came in.  It is simply all paper and ribbon.  The squares are 8 1/2 x 8 1/2 and the symbols were cut out on the Cricut using my SCAL software.  She took this home to hang in the boys' room.

Skyline Board
This sat behind the food on the table.  This picture is hard to see but there is a Spiderman on the left hand side, swinging between the buildings, a Superman in the sky and a Batman on the right hand side on top of the building, facing the "Batman Symbol" in the sky.  The Batman symbol is made of vellum, and was created in my SCAL software.  A couple of girls came up with this idea for the back of the table and my husband and I created it!  It turned out great.  Adding all the superheros was my husband's idea! 

Superhero Lollipops

These were inspired by Pinterest!  If you go on www.pinterest.com and search "superhero lollipops" a similar version comes up for boy valentine ideas.  Their cape had hearts on the back and said something like "you're super".  I designed these in my SCAL software and made them Superman, Batman and Spiderman lollipops instead.  I put them into a little Batman can that I got at Target for one dollar!  I inserted a foam cone shape and stuck the lollipops down into it and covered it with black paper that I ran through my paper shredder!  Everyone took one home for their boys!


Banner
I designed this in my SCAL software as well.  I cut out the Superman diamonds and adhered the letters to them, hung them on black ribbon, and called it done!  So cute.

Diaper Cake/Burp Cloths
A friend had this designed by a girl she works with!  How cool does this look????  The Superman words and symbol are both iron-ons so she could take these home and make something with them for the baby.  She made these very cute superhero and robot burp cloths and table cloth as well!  They turned out great!

The Cake/Cupcakes
The cake turned out so cute, don't you think!!!  The superhero cupcakes were adorable!  We saw the cupcakes on Pinterest...they were just baby faces, but my friend turned them into masked superheros!  How awesome is she???  She did the cake and cupcakes and it all turned out so cute and yummy!!  I never knew she had so much talent!  :-)  We told her that she was going to become the "cake lady" now that everyone knew she could do this! 

The shower was a great success and it was lots of fun creating all these fun decorations!  It is always an adventure when it is homemade!!!


Friday, January 27, 2012

Meeting Darcie


This page is going into my little girl's album.  These are pictures from the day that my brother and his wife came to "meet" Darcie for the first time!  As you can see, she was a real hit!  :-)  This picture is not the best, but the base is a dark pink that has the appearance that is has been inked.  The pictures are on a grayish green color and the middle picture and the journaling box are both graph paper that I inked with a "Old Olive" from the Stampin UP! Earth Elements set.  The border on the bottom was from a pack that I think I got at Big Lots.  The stickers are from a Creative Memories stamp set as well as the epoxy stickers.

This is a simple page, that literally took 20 minutes or less.  I have lots to do this week and needed something quick.  My friend's shower is tonight and you will see several things next week that were made for that shower.  I can't reveal them yet!!! 

Remember, that it is always fun and always homemade!!!

Tuesday, January 24, 2012

"Blue" Without You!


So, I sat down to make this card (while my kids were playing) thinking that it was only going to take me a few minutes to make....WRONG!  I got this idea from the Paper Crafts January/February 2012 issue on Pg. 44.  It is a simple brown card with "ME - YOU = BLUE" stamped in blue ink, going across the middle of the card, all on one line.  Well, the stamps I wanted to use (as you see above) didn't fit on one line...so, I put the "BLUE" at the bottom of the card...it didn't look right!  I played with a few embellishments to fill up the empty space but it just didn't come together for me!  I was getting frustrated because I didn't want to get the stamps back out and start over so, I cut the sentiment out, inked the edges, and did this layout instead!  The edges are inked with two different shades of blue;  a lighter shade first, and then a darker shade on top.  Whatever works, is what I always say!  The "BLUE" is adhered with pop dots to give it a little dimention and the ribbon has three bows tied onto it.  It actually turned out alright!  It took me much more time than I planned for but the kids were still playing when I got done, which was great!

Have a great day of crafting and remember, it is always homemade!

Banana Chocolate Chip Bread


This is a random post for the week....I have made this recipe a few times when I have bananas starting to get a little mushy. It is one of those great recipes to make and freeze for another occasion! I usually make it and freeze it and then pull it out and bake in the oven for about 10 minutes or so just to make it warm again....it is sooooo good when it is warm! Bread is always the best right out of the oven, I think!

This recipe is adapted from Rachel Ray's recipe online at Food Network. I changed the oil to applesauce to lesson the fat and did half whole wheat flour and half all purpose flour. I also added A little vanilla extract because everything is better with a little bit of that! Hope you enjoy!

Ingredients:

1/4 cup of natural applesauce
3/4 cup of whole wheat flour
3/4 cup of all purpose flour
1 cup sugar
1 tsp of baking soda
1/2 tsp of salt
2 eggs or 3 egg whites
3 bananas or 1 cup of smashed bananas
1 cup chocolate chips
1/2 tsp of vanilla extract

1. Mix all the dry ingredients.
2. Add applesauce, bananas, eggs and vanilla extract. Mix well.
3. Stir in the chocolate chips.
4. Pour into one greased big loaf pan or two small ones.

Bake at 350 degrees for about 70-80 minutes for the large loaf pan OR about 25-30 minutes for the two small pans.

Hope you enjoy this healthy treat! Remember, it is always delicious when it is homemade!

Saturday, January 21, 2012

Lost...Without You


Okay, so, get ready....there are going to be two "sappy" cards this week.  My husband is going out of town in a few weeks and I have to have a couple of cards to send in his luggage...so, I'm sorry, but I hope you can use the ideas for someone you love!  Here is a card that I came up with but the "map" idea came from the Paper Crafts 350 Cards Special Issue.  They use map paper for several layouts...so, I went and got the atlas out of the van (don't tell my husband) and tore out a page of Canada's map...I don't plan to be driving in Canada anytime soon!  I already had in my head the phrase "lost...without you" done with map paper but I just sat down and whipped this card up the other day!  It was fun and I know my husband will grin when he sees it in his luggage.  One time recently, I totally forgot to send the cards in his luggage and he was bummed when he got to his hotel room and started looking for his usual envelope of cards!  I felt HORRIBLE...I had them, just didn't put them in the luggage...so, moral of the story is:  I WILL NEVER FORGET AGAIN!!!! 

Anyway...this week is VERY busy and I cheated this week...I did all the blog posts for this week last week...but, I still met my proposal of one card, one random post (craft/card), and a scrapbook page!  I am getting ready for my friend's Superhero Baby Shower at the end of the week and we have something going on every night this week...so, I had to work ahead a little bit.  After the shower, there will be a couple of things posted regarding the shower decor but I can't reveal it yet!

As for the card above (that IS what this blog post is suppossed to be about) the base card is brown and is 5 1/2 x 4 1/4.  The piece under the map page is a patterned piece of cardstock that was in my scrap file and measures 4 x 5 1/4.  The map piece is 3 1/2 x 4 3/4.  I rounded all the corners and inked all the edges (you are going to find I do this a lot, it is a sickness, really).  I then tied the ribbon on the map piece and adhered the map on top of the patterned piece of paper.  At this point you want to go ahead and secure the two snaps in the upper corner.  Then adhere this to the card base.  After you have done all this, you need to stamp "lost..." and "without you" on a cordinating piece of paper;  I chose blue.  I then cut the words out, used my corner rounder and inked the edges (of course).  I used pop dots for a 3D effect.  Inside the card, I adhered the "without you" down onto the inside flap.  You're done!

You now have a cute card to give to someone you love and remember, it is always homemade! 

P.S.:  Maybe when my husband opens the card, he won't realize that I used the Atlas out of the car!!!   :-)

Pinterest Border Idea


If you haven't joined www.pinterest.com, you need to immediately! If you are not familiar with it, it is a website where you can "pin" ideas you see on the Internet onto a virtual pin board so that you can always find the idea you saw a month ago on the Internet. I was always seeing really cute stuff on the Internet and always writing down the website and then loosing the paper somewhere along the way! This way, it is all in one place, divided into categories and so easy to keep up with. I not only "pin", I actually have done many things that I have seen on there! My husband calls me the CEO of Pinterest!


Anyway, from time to time, I search scrapbooking layouts on Pinterest and the other day I found one with a similar border as the one that I did on this layout. This was so cute, easy and quick! Just the way I like them! This layout is going into my daughter's First Year album...this is when we first did a bath at home and she is 18 months old now! I remember it like it was yesterday! Hope you have fun looking and creating and remember it is always homemade.

Wednesday, January 18, 2012

Quick Card Sets for ONLY $1...


Seriously, Joann's sells these little packs (seen below) for only $1!  They are little pieces of pre-cut paper that all match and that are PERFECT for quick cards.  Some of the pieces have "pretty" edges that appear to be done with an edge punch.  All you have to do is pick a few pieces that you want to use, cut them to the size you want and adhere to the card base that you pick.  There will be a few more cards like this on the blog soon!  These are so easy, quick and you know that all you need is this little pack of 10 sheets of random paper. 


I don't know if you can tell from the picture but the bottom piece on the right side and the green strip I ran through my paper crimper just to add a little depth.  The top piece that is stamped with the sentiment is glued down with pop dots to give a 3D effect. 

It is as easy as cutting the pieces down to the size you need (it won't need much taken off of it), inked the edges, used the paper crimper, stamped the sentiment and adhered it all down.  Then I added two pearls for a little embellishment.  That's it! 

Remember, your idea can come out of a $1 pack of paper, it can be quick and easy, and it just has to be homemade.

Tuesday, January 17, 2012

My OCD...


I will be the first to admit I am a little OCD in some areas of my life! The first step is to admit the problem, right? So, call me crazy but I organize my scrap paper file! Yes, I said file! I have a black file that has three compartments in it and I file my scrap paper according to color. I also have one large area in the file that is all printed paper and it is somewhat divided into sizes. I know you may think that I am crazy for doing this but when I need a small sheet of paper, whether it be for a card, a punch or for a small piece to be cut on the Cricut, it is easy to find what I am looking for and I don't have to waste a whole piece of paper.

We all have a scrap paper bucket of sorts, but do you actually use it? Is the reason because you don't have the patience to go through the whole drawer? Is it because you don't even know where to start looking for it? Is it because you don't even know what is in that drawer? Come on, people, now doesn't it make sense to organize that scrap paper drawer? Go to Walmart, buy an accordion style file folder and make your life a little bit easier and organize your scraps! It will be worth it in the end! I do have to clean it out once in a while...it gets a little TOO crazy in there but it really does make scrapping a whole lot easier and cost efficient! Think of all the paper you will be saving!

In two weeks, I plan to have a scrap paper challenge...and there may also be a prize for a random reader! Just a little heads up for those who read regularly! After next week, my life gets a little less crazy (or so, I keeps telling myself)!

Get up and go organize that scrap paper! I will have a new project tomorrow! See you then!

Sunday, January 15, 2012

Pink Stamper Blog Hop Project


If you don't follow "My Pink Stamper" at http://www.mypinkstamper.com/, then you need to put this website on your favorites RIGHT NOW!  If they were to award a Cricut Queen, it would be her!!  Her name is Robyn and she has some great ideas, many projects, countless videos...etc!  She is always giving away cartridges, Cricuts and stamps from her own stamp line.  All you have to do is leave a comment on her posts and you are in the drawing.  I think about once a month or so (I am not sure of the frequency for sure), she has a blog hop that includes about 15-20 fellow designers.  There is a theme for each "Blog Hop" and each person does their own craft using the Cricut and the given theme.  It is a great way to get your juices flowing and I like to look at all the ideas they come up with.  Everything is different but is still revolving around the theme somehow.  Anyway, I have done the Blog Hop but never the challenge.  I usually don't have time on the weekend to even think about making something new...but, this week, I needed to make a card for my son to send to a little boy here in town that is fighting cancer, so, that is my project for the challenge.  Her challenge was to make something for yourself or that you would give someone to welcome a fresh start of the new year.  She says, pretty much everything goes!  So, that is what I have done today...made a card for us to send to someone who needs a lift.


Here is what I started with and I think I actually used it all!  Sometimes I will cut pieces out but in the end they don't fit like I thought they would, so, I throw them away...  I cut out the pirate and all his "pieces" as well as a piece of off-white paper for the card base.  It is 5 1/2 x 8 1/2.  I inked the edges of the card, the treasure box, the map and his body.  To add the hook on the pirate's hand you must cut off his fingers so that you don't see them...FYI!  I then ran most of the pieces through my xyron machine and started to assemble the card front.  I needed space at the top for the "Get Well" stamp, so I placed the pirate and his treasure on the bottom part of the card. 

Another thing that I do is I use face stamps instead of the cut out face on the cartridge.  I cut out the "blackout" body and stamp the face on later.  Peachy King Stamps (www.peachykeenstamps.com) sells all kinds of different face stamps for the Paper Dolls and they have other ideas on how to use them on their website.  I bought the basic face set.  It has 6 different expressions in 5 different sizes as well as one big size for the larger size dolls.  I definitely recommend this stamp set if you use the paper doll cartridges a lot!  It was one of my best purchases!  It is roughly $25 for the set...worth every penny!


I didn't have room on the front of the card for the map, so I put it on the inside and colored in the "X" with a red pen.  Also, the inside of the card reads,  "...because I need help hunting treasure!"  You can make up any line that will make the sick child smile!  Have fun and remember, it is always homemade!!!!  Enjoy the coming week.  Happy Crafting!

Saturday, January 14, 2012

Fun in the Sun!!


If you can believe it, I actually did 4 page layouts this week.  Now, these two layouts were simple and fast but still portray the "fun" we had in the "sun" in July of 2009! 


The first layout is at a place in town where the kids love to play in the water during the summer months.  There are a couple of places where we live that are, what we call, "The Splash Pads".  I don't know who came up with this term but it fits the two places well.  One is downtown and one is in an outdoor mall.  It is basically an area that is filled with spouts that come out of the ground and shoot water up into the air.  During the summer, it is the place to be!!!  It is a great place to let the kids run and play in the water and basically have a blast!  I got this layout idea off of Google Images of all places.  If you go to http://www.images.google.com/ and search scrapbook layouts, a million come up...just browsing through them will get your juices flowing.  I needed a layout that would fit several small pics and using the photo strips was great for these pictures!


The second layout is made up of a few pictures I took in the backyard of our son playing in the blowup pool!  He LOVED it!  I took many pictures that summer of him having a blast in the backyard playing in the water.  He loves the water!  He usually takes a few minutes to decide to actually get in, but after that, he is good to go!  Anyway...hope you enjoy the layouts.  The layout of this page literally just came to me.  I had it all laid out before I stuck it down and when I actually put adhesive on everything and laid it down...it turned out totally different than it was originally laid out!  It was such a better layout!  Crazy, I know, but I am sure something similar has happened to all of us!  These layouts were fast and easy to put together!  Remember, my motto...It doesn't have to be hard or time consuming, it just has to be homemade!

Friday, January 13, 2012

July 2009 Snapshots


Here is a scrapbook page I did this past Wednesday!  I will admit, it wasn't my favorite layout, but at least it is done, right???  I have always scrapbooked almost EVERY picture...well, no more my friends!  I have to get caught up and then maybe I will get back to my old ways!!!  I have decided to pick the "snapshots" of each month and do a collage of sorts instead of doing a page with each set of pictures from one particular day!   I saw this idea in a Creating Keepsakes magazine in the last couple of months and decided I HAD to do this or I would NEVER get caught up!  There are just too many pictures and I am sure many of you have the same issue.  So, this is my remedy for the problem.  You still get all the "highpoints" of the month, just in less time!  Sounds good to me...


So, here is my page for the month of July in 2009.  Now, this is not to say that there won't be other pages from the month of July to follow, but these are all the snapshots taken that month that really don't fit anywhere else.  I have tabs on each set of pictures that say what exactly is taking place.  I then have the journaling box in the middle of the page for extra info about each set of pics.  I used 4 different prints of paper that all correspond well...or so I think!  :-)  I then added some stamps and some stickers that would embellish the page a little bit more...there was empty space that needed something! 

I hope you enjoy and I hope this inspires you to do something quick, fun and homemade!  Have a great day!

Wednesday, January 11, 2012

....NO, It's SUPERMAN!!!!


My best friend is having her third baby boy in March (she had twins her first pregnancy) and I and several ladies from church are throwing her a Baby Shower at the end of the month.  I made all the invitations for the event (with a little help from a friend at craft night, Friday night at the church building).  Her husband is a huge Superman fan and her two 6 year old twins love any kind of Superhero there is...esp. Superman, Spiderman and Batman!  So, that is how I came up with the theme for the shower.  The boys' room (all three) is done in Superman/Superhero decor.  They did a really cool job with the painting and decorations!  So, I went to work with the invitation idea.  My husband did help as well with the invitation "mock up" a couple of months ago.  He changed a couple of things on my original idea but I admit, his idea wound up looking better in the end!  (I had to mention his help, so that he doesn't get left out!  :-) ) 

Anyway...I cut the "S" out on my Cricut using my SCAL software and the yellow diamond as well.  I attached them together with spray adhesive.  It worked great on the "S" since it is not one whole piece!  I then printed out the Shower info on white cardstock, cut it out in a diamond shape using a template cut out on the Cricut as well.  I inked the edges of the white cardstock with blue ink and then attached it to the yellow diamond.  It looks so cute.  I know it is different for a Shower Announcement but whatever it takes to suit the theme, right?   

I know that Cricut sells a Superman Cartridge and I am sure that this emblem is on the cartridge;  just FYI if you don't have the SCAL software.  I know our Hobby Lobby has this cartridge right now for $28 in the clearance area.  ALWAYS check the clearance, you never know what you might find!  Remember, it might be "out of the box" but it is always homemade!

Monday, January 9, 2012

Nuts About You!


Okay...Here is the card for the week.  It was inspired by an idea in the Paper Crafts "365 Cards" Special Issue.  It is on page 25 of the magazine in the "Valentine" genre.  The color in the magazine is all white paper, with inked edges.  The sentiment is "nuts about you" and instead of acorns it is actully hardware nuts glued onto the bottom paper.  Here's my little soap box for the day...let's get real, people, hardware nuts are way too HEAVY for reality.  Sometimes I think that the creations in magazines/online, etc.., get too creative and not practical.  It would cost a fortune to mail a card with hardware nuts!!! 

Anyway...enough of that, on to the card directions.  My card opens to the right side...I cut a white piece of cardstock 11 x 4 1/4 and folded it in half with a bone folder.  (If you don't have a bone folder you NEED one!  You can buy one at Hobby Lobby for under $4, especially if you use a coupon.)  Then you dicut a heart out of a red (or any color you prefer) piece of paper and then cut it down to 4 x 5 1/4.  I positioned my heart into the bottom right hand corner but you can position it wherever you want to on the front of the card. I also rounded my corners but that is just my preference! 

When you have both pieces of paper cut to the size you need as well as the heart cut out, you lay the red paper on top of the white card where you want it to be positioned.  Trace the heart very lightly, with a pencil, onto the card front.  Remove the red paper and this is what your white card should look like:


Next, what you want to do is stamp the acorns inside and around the heart shape that you have traced.  Remember that you will only be able to see the heart shape when you attach the red paper later.  It should look something like this:


Next, you need to stamp your sentiment onto the red paper and add any embellishments that you want to put on the front of the card.  Then, you put some pop dots on the back of the red paper and adhere it to the front of the card with the heart right over the stamped area.  You are done!  Wasn't that easy??? 

Another option, instead of using the acorns, is to adhere strips of ribbon diagonally onto the heart area and then you have a multicolored heart underneath and you can just simply stamp "I Love You" as the sentiment. Be creative! 

Hope you enjoyed this card!  I send cards in my husband's luggage when he travels out of town...I think I will keep this one for him!  This would be a very cute Valentine card as well!  Have fun and remember, simple is perfect and always homemade!

Sunday, January 8, 2012

New Look....Same Blog


No, you're not on the wrong blog! Don't click away and try again...you will wind up in the same place. It's still H.S. Homemade by Holly, it just looks a little different...I hope you like it. The orange was getting on my nerves, so I started to experiment with blog templates! Anyway...I know I will post 3 times this week...one card, one scrapbook layout, and a baby shower announcement I just completed for my best friend's shower at the end of the month. See you in a day or so!

Saturday, January 7, 2012

First Scrapbook Page of the Year...


So, I did it!!  I actually accomplished my goal for my first week...you were getting nervous, weren't you!!  :-)  I sat down yesterday and got out my pictures that were next in our family album....June of 2009!  Yes, I am that behind in the Family Album...that doesn't include my other albums that are just sitting, waiting for some new pages to join them! 

Anyway...This layout was quick and easy to assemble.  I had several random pictures from my father-in-law's 70th Birthday Party.  I actually got this layout idea from a Pinterest pin on how to layout frames on a wall in your house...see, you can use anything for an idea!!  I added the pictures in the layout (they are 3x3s and 3x6s) and then added a newspaper announcement his wife put in the local newspaper the week of his birthday.  I then framed the pictures with two matching sheets of paper and stamped a border all the way around the pictures.  I then used a border punch on the graph paper and inked it and I am going to use this as my journaling area for the page.  I added the "70th" with brown stickers to match.  Quick, simple and always homemade!

Thursday, January 5, 2012

Cricut Expression Dust Cover


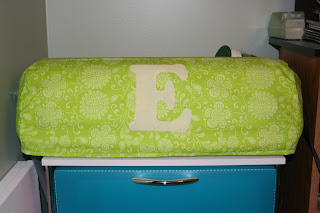
I have been wanting to make one of these dust covers for a LOOOONNNNGGG time!  I dust my Cricut off all the time!  I have seen so many that people have bought or made.  I can sew but I can't just make a pattern up real well...but, I just found a blog that gave you a link to a pattern already made for you!  I was so excited.  Below is the link to the Custom Crops website and you can click on the pattern and watch the videos on how to assemble.

http://www.customcrops.com/article_info.php?articles_id=160

My first one was the aqua colored one you see above.  I was so excited I found the pattern that I just HAD to make one that day!!  So, I went through the fabric that I have and this piece was the only piece that I had leftover that was the right size for the pattern...so, I went to work.  It only took me 20 minutes to cut and sew this together!  Seriously!!!  Well, this is not the fabric that I would have chosen but it actually looks pretty good with my 2 sets of drawers that I have in my craft area. 

Now that I had practiced, I decided to make one for my friend's birthday which was on Tuesday.  It was just as easy (if not easier) the second time around.  This time, I thought I would get brave and monogram it with an applique for her.  Her first name starts with "E" so, I cute out an "E" on my Cricut in a matching fabric and appliqued it right up!  This is my FIRST applique ever!  I think it turned out pretty good.  It's not perfect, but it is so cute!!!  Cutting out fabric on the Cricut may have to be a post all its own one day soon.  It is so easy.  I will give you a heads up if you want to know how to do that now...go on http://www.youtube.com/ and search "How to cut fabric with your Cricut"....you will get MANY videos on how to do this!  It is great and opens up more possiblities with your Cricut!

Anyway...I hope you have fun creating a Cricut cover for yourself or someone else.  Custom Crops also has a pattern for the smaller Cricut if you have that size.  I had so much fun doing these, I am sure I will make another one day.  I like the monogram applique so much that I might have to put one on mine now!!  Remember, it doesn't have to be difficult, it just has to be homemade!

Wednesday, January 4, 2012

For Scrabble Lovers...Or Not


This is the first scheduled project for the year!  My first card of the year, of this week, and of my proposed schedule!  I will post a scrapbook page layout later in the week (which I need to start working on!). 

Even though we are not Scrabble "lovers" I thought this card was so cute.  I saw it in Paper Crafts' special edition magazine, "365 Cards".  I had to order it online but it was totally worth it!!!  It has so many cute layouts for cards for every occasion throughout the year.  This card was on page 49.  I'm not sure exactly what they did for the lines behind the letters, but I scored the lines horizontally and vertically and then inked them lightly.  You could also draw very light lines behind the letter tiles.  It turned out really cute.  For the letter tiles, I drew the letters on 1x1 inch pieces of paper with a brown colored pencil.  It turned out so cute.  I think next time I will make the tiles a little bit smaller but other than that, it turned out great!  My sister and her husband are big Scrabble players and she was here this past weekend, so I gave it to her to send in her husbands lunch one day!  Enjoy and remember that it is always homemade!!

Sunday, January 1, 2012

New Year's Eve FUN...


This year, my side of the family came to our house for the holidays!  We are actually did our "Christmas" on New Year's Eve.  We had our big meal at lunch yesterday and for dinner roasted hot dogs in the back yard over our fire pit.  We bought one this year the day after Thanksgiving for REALLY cheap and we had to break it in somehow...what better way than with family???  So, after the dinner was over, I had a little surprise for everyone...we made s'mores, "real" popcorn in a pan on the stove and then we had sparkling grape juice with our funny straws!  Everyone was a good sport and of course we took some fun pictures!  I saw this idea on a blog somewhere along the way and decided it would be a fun thing to do on New Year's!  I cut the mustaches out on my SCAL software and I did all kinds of different styles!  Then, I put two slits in each and attached them to drinking straws!  How fun is that!!!  Remember it is always fun when it is homemade!

Followers


Copyright © 2008 Designed by SimplyWP | Made free by Scrapbooking Software | Bloggerized by Ipiet Notez | Blog Templates created by Web Hosting Men